If your inbox is where most of your working day disappears, giving a virtual assistant access to it is one of the highest-leverage moves you can make. Both Gmail and Outlook have built-in delegation features that let your assistant read, sort, and respond to emails on your behalf without you handing over your password. You stay in control of what they can see and do, and you can remove access instantly if anything changes.
This guide covers how to set up Gmail and Outlook delegate access, how to keep things secure, and what to tell your assistant once they're in.
Frequently asked questions
A few questions come up almost every time someone sets this up for the first time. Before diving into the steps, here are the most common ones, answered.
Do I have to give my assistant my email password?
No. Both Gmail and Outlook have built-in delegation features that let your assistant access your inbox without you sharing your login credentials. They get their own access link, and you can revoke it at any time without changing your password.
Can my assistant send emails as me?
Yes. Gmail delegates can send emails that display as "sent by [assistant's name] on behalf of [your name]," which keeps things transparent. In Outlook, depending on the permission level you set, your assistant can send emails that appear to come directly from your address. You can also ask your assistant to draft responses for your review before they go out, which many founders prefer when they're first getting started.
Can I give my assistant access to some folders but not others?
Gmail's delegate access shares the full inbox by default, though you can ask your assistant to only work within specific labels. Outlook gives you more granular control: you can grant access to your inbox, calendar, contacts, and tasks separately, at different permission levels.
Is it safe to share inbox access with a virtual assistant?
With the right setup, yes. Using built-in delegation (rather than sharing a password), enabling two-factor authentication, setting appropriate permission levels, and having a signed confidentiality agreement in place covers the main risk areas.
My assistant uses a personal Gmail account. Can they still access my work inbox?
If you have a personal Gmail account, you can delegate access to any Gmail address. If you're using Google Workspace (a business account), your workspace administrator may need to enable delegation in the admin console before you can set it up. Check with whoever manages your Google Workspace account if the delegation option doesn't appear in your settings.
What email clients does this work with beyond Gmail and Outlook?
The steps in this guide cover the two most common setups for founders. If you use Apple Mail, it connects to Gmail and Outlook accounts, so your assistant can access your emails through either of those delegation setups. For other email clients, check whether your email provider offers a delegate or shared access feature.
What your virtual assistant can do with inbox access
Once your assistant has delegate access, the practical scope is broader than most founders expect. Depending on how you brief them and what permissions you set, they can:
- Triage your inbox daily and flag the important emails that genuinely need your attention.
- Draft replies in your voice for your review before sending.
- Respond directly to routine messages: meeting confirmations, referral acknowledgments, supplier queries, standard FAQs.
- Unsubscribe from newsletters and marketing lists that clutter your inbox.
- Set up filters and folder rules so incoming mail routes itself automatically.
- Follow up on unanswered threads that have gone quiet.
- Extract action items from email threads and add them to your task manager.
- Keep a running log of anything time-sensitive you need to act on.
The key to making this work is giving your assistant a clear brief upfront: which senders are high priority, which messages they can handle independently, and which messages always need to reach you directly. More on that in the briefing section below.
How to give a virtual assistant access to Gmail
Here is how to set it up in Gmail. You will need a desktop browser, as the Gmail app does not support this.
Step 1: Sign in to your Gmail account
Open Gmail on a desktop and sign in.
Step 2: Open settings
Click the gear icon in the top right corner of your inbox. Select "See all settings" from the dropdown.

Step 3: Go to the Accounts and Import tab
Click the "Accounts and Import" tab across the top of the page. On some Google Workspace accounts, this may appear as the "Accounts" tab only.
Step 4: Find the account section for grant access
Scroll down to "Grant access to your account." Here you can control whether a delegated user's actions mark emails as read or leave them unread. Personal accounts support up to 10 delegates; a Google Workspace business account supports up to 25.

Step 5: Add your assistant's address
Click "Add another account." Enter the assistant's email address in the dialog box and click "Next."
On a personal Gmail account, the assistant's email must also be a Gmail address. On Google Workspace, both you and your assistant need to be in the same domain. If your assistant uses a personal address and you are on a business account, your admin console may need to enable cross-domain delegation first.

Step 6: Send email to grant access
Check the assistant's email address. If it is correct, click "Send email to grant access." This delivers a delegation invitation to your assistant.
Step 7: Your assistant accepts the invitation
Your assistant will receive a confirmation link by email. Once they accept, they can start managing your inbox. The change can take up to 24 hours, though it usually activates within minutes.
How to revoke Gmail delegate access
Go to "Settings," navigate to the "Accounts" tab, scroll to "Grant access to your account," and click "Delete" next to the relevant name. The delegated user loses access within minutes. You do not need to update your credentials.
How to give a virtual assistant access to Outlook
Outlook delegate access gives your virtual assistant permission to manage your inbox, calendar, and tasks.
The setup process differs slightly depending on which version of Outlook you are using. Your assistant does not have to be on the same version of Outlook as you, but you'll get the smoothest experience if they are.
In New Outlook and Outlook on the Web
Step 1: Navigate to your inbox
Open Outlook and go to your inbox.
Step 2: Open Sharing and permissions
Right-click on your inbox folder, or your root mailbox name, and select "Sharing and permissions."

Step 3: Add your assistant
Enter your assistant's name or email address in the search field and select them from the results.
Step 4: Set permissions
Choose a permission level from the dropdown.
• Reviewer gives read-only access.
• Author allows reading and creating email messages.
• Editor lets the assistant read, create, and modify items across your mailbox. Editor is the recommended starting point for full inbox management.
Other, more granular roles include:
• Owner includes all Editor rights, plus the ability to change folder permissions for other people.
• Contributor is a highly restricted role that allows your assistant to create items only, such as adding to a folder, but not to read what is already there.
• Publishing Editor/Author work the same as their standard equivalents, but with the additional ability to create subfolders.

Step 5: Click OK
Click "OK" to confirm. Changes to Outlook accounts can take up to 60 minutes.
In Classic Outlook for Windows
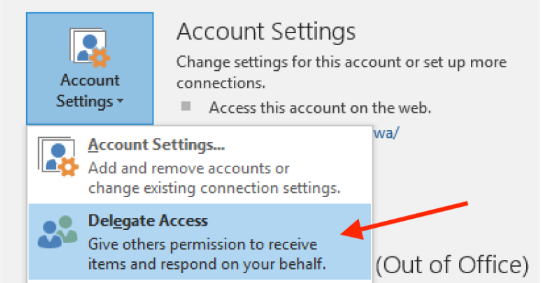
Step 1: Open Outlook and go to Account Settings
Launch Outlook, click "File" in the top left, select "Account Settings," then choose "Delegate Access."

Source
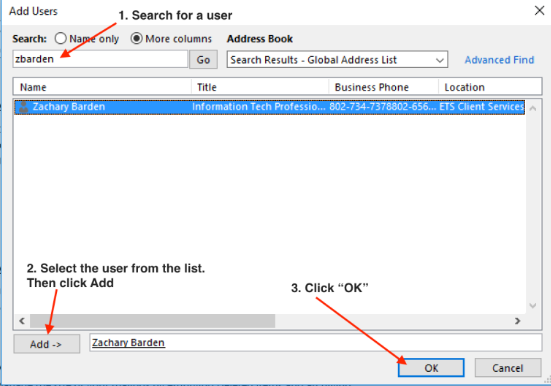
Step 2: Click Add
In the Delegates window, click "Add" to open a contacts search box.

Source
Step 3: Find your assistant
Type your assistant's name or email into the search field, select their name, click "Add", then click "OK."

Source
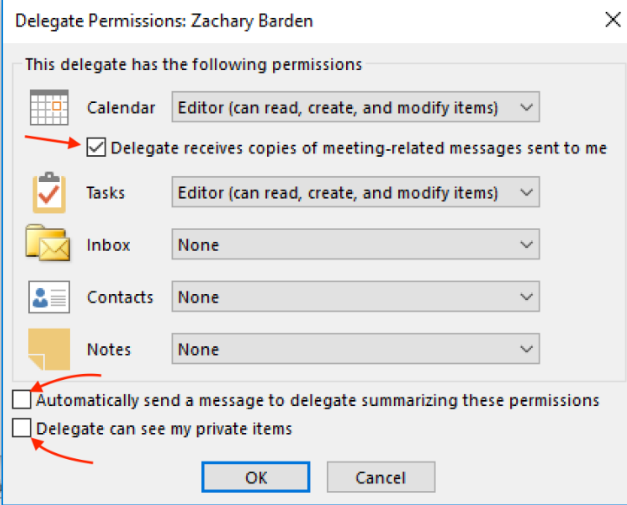
Step 4: Set permissions
The "Delegate Permissions" window lets you control what your virtual assistant access covers. Outlook accounts offer three levels.
• Reviewer gives read-only access.
• Author allows reading and creating email messages.
• Editor lets the assistant read, create, and modify items across your mailbox. Editor is the recommended starting point for full inbox management.

Source
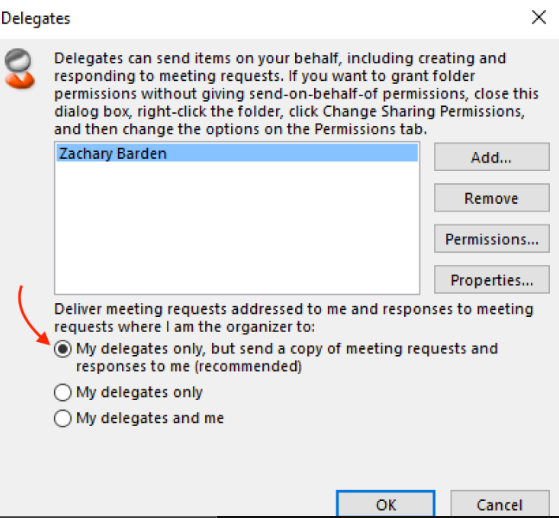
Step 5: Handle meeting emails
Decide how meeting invitations are routed. Having both you and your assistant receive meeting-related emails is the most practical setup.

Source
Step 6: Send your assistant a notification
Check "Automatically send a message to delegate summarizing these permissions." This creates a clear record of the access they have been granted.
Step 7: Allow access to private items (optional)
Check "Delegate can see my private items" if you want your virtual assistant to view private calendar entries. Leave it unchecked to keep personal items out of the shared view.
Step 8: Click OK
Click "OK" to apply. Changes to Outlook accounts can take up to 60 minutes.
Two things to sort out after setup
Once you have granted permissions, your assistant will need to add your mailbox or folder to their own folder pane in Outlook before they can see it.
By default, emails sent by your assistant will show as sent on your behalf, which is visible to recipients. If you need them to send as you without that label appearing, this requires a "Send As" permission configured by your organization's administrator. It's worth checking this with your IT contact or Microsoft 365 admin before setup.
How to update Outlook delegate permissions
In New Outlook, right-click the folder, select "Sharing and permissions," and adjust or remove the relevant entry.
In Classic Outlook, go to "File" > "Account Settings" > "Delegate Access," select your assistant's name, and click "Permissions." Adjust the level as needed to limit access, or click "Remove" to revoke all access.
How to keep your inbox secure
Sharing access to your inbox is a reasonable concern for any founder. Here's what good security looks like in practice.
Use delegation, not your password. Gmail's delegate access and Outlook's delegate permissions were designed for exactly this scenario. Your assistant can read, reply to, and manage emails without ever seeing your login credentials. This is the right approach.
Enable two-factor authentication. If you haven't already, turn on 2FA on your email account. It adds a layer of protection that has nothing to do with your assistant and protects you regardless of who has access.
Set the right permission level. Both Gmail and Outlook let you control what a delegate can and can't do. In Outlook, the Reviewer level (read-only) is a good starting point if you're still building trust. Editor access makes sense if you're comfortable with how your assistant works.
Review access periodically. A good rule: check your delegates list every 60 to 90 days. If you switch assistants or no longer need the support, revoke access the same day. In Gmail, this takes about 30 seconds via Settings > Accounts.
Keep private items private. If you're an Outlook user, the option to mark calendar entries or emails as "Private" prevents them from showing up in your delegate's view, even if they have broad access. Use it for anything you'd rather keep out of the workflow.
Sign an NDA. If your inbox regularly contains commercially sensitive information (client contracts, financial data, employee matters), ask your assistant to sign a non-disclosure agreement before giving access. Time etc assistants already operate under confidentiality agreements, but it's worth confirming with any VA you work with.
Briefing your assistant: what to cover before they start
Access without context creates more work, not less. Before your assistant opens your inbox for the first time, spend 30 minutes covering the following.
Priority contacts and topics. Give your assistant a short list of senders who always get a prompt response: key clients, your accountant, business partners, investors. Any email from this list should come straight to your attention.
What they can handle independently. Be specific. "You can reply to meeting requests, speaking invitations, and anything from our newsletter list" is more useful than "use your judgment." The clearer the brief, the fewer check-ins you'll both need.
Your preferred tone. Share a few examples of emails you've written. Your assistant needs to sound like you, not like a customer service template. The more examples you give early, the faster they'll calibrate.
A folder or labeling system. Ask your assistant to set up a few standard folders: something for emails awaiting your review, something for emails they've handled, and a priority flag for anything urgent. This gives you a simple way to see what's happening without having to read everything yourself.
Response templates for common queries. If you get the same types of questions repeatedly, such as pricing, availability, and referral requests, write short template answers that your assistant can adapt. This cuts response time and keeps your voice consistent.
A quick video call or voice note works better than a written brief for most founders. Walk your assistant through your inbox live, show them what matters, and let them ask questions. You'll save yourself far more time than the call takes.
What's the bottom line?
Your inbox is one of the most personal parts of your working life, and handing access to someone else takes a degree of trust. That trust gets easier when the setup is solid: when you know exactly what your assistant can see, what they're empowered to handle, and how to pull access back if you ever need to.
Once all this is in place, most founders find the hardest part was simply deciding to do it. Everything after that tends to take care of itself.
Ready to get your inbox under control?
Setting up delegate access for email management takes less than ten minutes. After that, your inbox becomes one less thing to worry about, follow-ups get handled, and you get back the hours and headspace that a full inbox eats up every week.
Time etc has been helping founders do exactly this since 2007. Over 22,000 people have used our service to reclaim their time and focus on the work that actually matters.
We were built by a founder who lived through the exact same challenges, shaped by the experience of Sir Richard Branson's longtime assistant Penni Pike, and we've spent nearly two decades refining what great assistant support looks like in practice.
We handle the hiring, matching, and oversight. You just focus on your work. And if something isn't clicking, we'll fix it. That's our guarantee.
Ready to get started?
Speak to our team to tell us what's on your plate, and we'll take it from there.
| Book a free call | Try our Task Wizard and get $150 off your first month of virtual support |